Run PHPUnit Tests With One Click using PhpStorm and Vagrant
If you are struggling with configuration of PHPUnit with PhpStorm and Vagrant, this post covers all resources you need and provides necessary tips to run your tests with a single click.
January 4, 2017 · 3 min
Vagrant and PhpStorm are two of the most powerful tools in any PHP Developer’s arsenal. My productivity has definitely increased ever since I started using these.
Once you start using PhpStorm, you will learn that it has a lot of features. I’ve been using it for a year now and the amount of things that I can do regularly surprises me.
From terminal to debugging to testing, everything is available right in the IDE. However, it is also quite complicated and you may find yourself burried under a myriad of options it offers.
By the end of this post, you’ll be able to run your unit tests with a single click in PhpStorm. They’ll run using Vagrant’s PHP, so you don’t have to install anything locally.
This post is aimed at intermediate users who have already configured PHPUnit and Vagrant. If you haven’t done these, here are some good resources to follow. Go ahead, do these steps and come back to this post. It won’t take long.
Install PHPUnit. Make sure you do this in your VM. Just vagrant ssh from terminal or go to Tools [arr] Start SSH Session in PhpStorm and then follow the instructions. For this tutorial, I’m downloading phar file and placing it in /usr/local/bin.
By step 3, you should be able to ssh into your vagrant machine and run phpunit in the /vagrant/ directory (assuming you installed WP in the root).
The biggest pain right now is that we have to ssh into the machine and then type the command to run it. PhpStorm has inbuilt functionality that enables running the tests with a single click. However, the configuration is quite confusing. The [official guide](https://confluence.jetbrains.com/display/PhpStorm/Running PHPUnit tests over SSH on a remote server with PhpStorm) misses several details.
Here are a few quick steps to get the tests running:
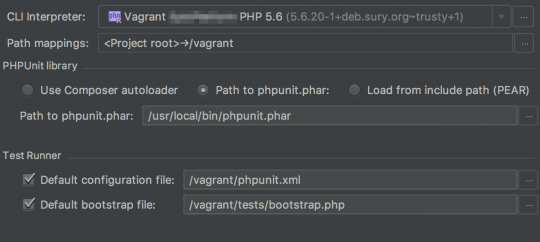
Go to Preferences [arr] Languages [arr] Framework [arr] PHP [arr] PHPUnit.
Add a new remote config using Remote Interpreter. Here’s how the configuration screen should look:
Go to Run [arr] Edit Configurations.
Add a new PHPUnit (not PHPUnit by HTTP) configuration. You can name it anything. Leave the default options enabled. Here’s a screenshot:
Warning If you select Directory as your test scope, it will be relative to the VM home and you will get an error like cd: /Users/xxx/Work/WP: No such file or directory. Just define the path in XML config file. Here’s my phpunit.xml for example:
Done? Make sure that this new configuration is selected and hit run. You’ll most likely run into this error:
This happens because you don’t have a phpunit.phar file in /usr/local/bin as we followed the official install method. To get rid of this, you can either create a copy of phpunit file or much better, create a symlink to phpunit file in /usr/local/bin. Just run these commands (again, inside Vagrant VM):
The advantage of creating a symlink over copying is that you can easily update phpunit by running phpunit --self-update and don’t have to worry about updating the other copy.
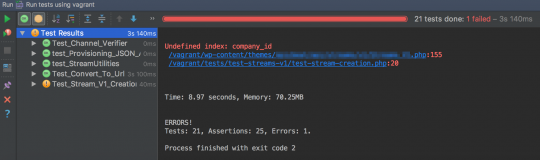
After following these steps, you should be able to run this configuration by hitting Run. Here are my results:
Do share this post on Twitter if you found it useful. If I missed anything, do let me know.